Images
How to Use Images
Any type of image file can be added to your portfolio. You can add images from your Files area or directly from the internet using the URL for the image you want to add.
Adding Images
There are two ways to add images to your portfolio. You can learn how to add images in the Adding Files or Image Gizmo sections.
Editing Images
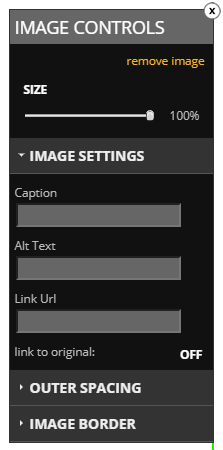
If you would like to make adjustments to any image in your portfolio, double click on the image you would like to format to open the Image Controls. The Image Control panel allows you to make several adjustments and add some styling to your image.
Remove Image
The remove image link will remove the image from your portfolio. Once this is done, it cannot be undone. You will have to re-add the image to bring it back.
Size
The slider under SIZE allows you to change the size of your image. 100% is the original size and anything smaller is just a reduced, proportionate size.
Caption
This allows you to insert text into the caption text box that will become the caption for the image. Captions are displayed under the image, separate from other text on the page.
Alt Text
This option allows you to define the alternate text that appears when someone is using accessibility tools when viewing your portfolio.
Link Url
By inserting a web link into the Link Url box, users will be taken to the desired web address when they click on the image.
Turning on 'link to original' will link your image to the original. When users click the image, they will be given a full sized copy of your image.
Outer Spacing
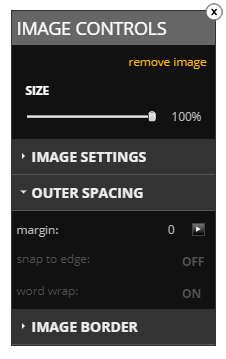
In the Outer Spacing area, you see options for margin, snap to edge, and word wrap.
- Margin is the space between the image and everything else on the page. The margin will be equally increased around all sides of the image.
- Turning on 'snap to edge' will allow the image to snap to the edge of the content box (outlined in green in the editor), ignoring any margin on that side.
- Word wrap allows for text to be beside the image. When word wrap is off, the entire line where the image is placed cannot have text on it.
Image Border
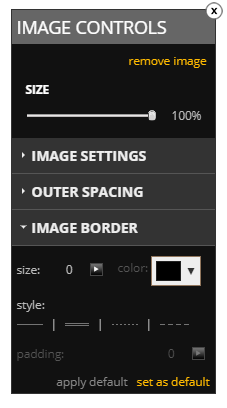
The Image Border features allow you to add a border around an image and adjust the size, color, style, and padding of that border.
- Size allows you to change the thickness of your border. The larger the size, the thicker the border will be.
- Color allows you to set the color for your border. You can choose the color by using the selector that pops up. The left most box allows you to choose a shade of a color, while the slider to the right of that box allows you to choose the starting color.
- There are four border styles to choose from: single line, double line, dotted line, and dashed line. Choosing a style will change the look of the border around the entire image.
- Padding allows you to put space between the border and the image. The greater this number, the larger the space. Just as in margin, this space is distributed evenly to all sides of the image.
Set As Default
If you plan on using a particular formatting multiple times, you may choose to set the style as your default. This will format any pictures that you add to your portfolio the same way as this image. If you wish to change certain aspects of the different images, you may do that also. Doing so will not affect the original image. Select 'Apply Default' to apply the default formatting to an image.